
Page 140 - ISCAR(HOLE_MAKING_CATALOG_65)
P. 140
USER GUIDE
INDEXABLE DRILLS Drilling and Chamfering in One Operation 4 SETUP
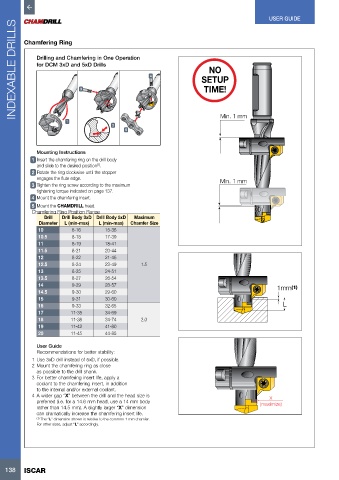
Chamfering Ring
for DCM 3xD and 5xD Drills
NO
TIME!
3
1 Min. 1 mm
2
5
Mounting Instructions
1 Insert the chamfering ring on the drill body
and slide to the desired position .
(1)
2 Rotate the ring clockwise until the stopper
engages the flute edge. Min. 1 mm
3 Tighten the ring screw according to the maximum
tightening torque indicated on page 137.
4 Mount the chamfering insert.
5 Mount the CHAMDRILL head.
Chamfering Ring Position Range
Drill Drill Body 3xD Drill Body 5xD Maximum
Diameter L (min-max) L (min-max) Chamfer Size
10 8-16 15-36
10.5 8-18 17-39
11 8-19 18-41
11.5 8-21 20-44
12 8-22 21-46
12.5 8-24 23-49 1.5
13 8-25 24-51
13.5 8-27 26-54
14 9-29 28-57 1mm (1)
14.5 9-30 29-60
15 9-31 30-60
16 9-33 32-65 L
17 11-35 34-69
18 11-38 34-74 2.0
19 11-42 41-80
20 11-45 44-85
User Guide
Recommendations for better stability:
1 Use 3xD drill instead of 5xD, if possible.
2 Mount the chamfering ring as close
as possible to the drill shank.
3 For better chamfering insert life, apply a
coolant to the chamfering insert, in addition
to the internal and/or external coolant.
4 A wider gap “X” between the drill and the head size is X
preferred (i.e. for a 14.6 mm head, use a 14 mm body (maximize)
rather than 14.5 mm). A slightly larger “X” dimension
can dramatically increase the chamfering insert life.
(1) The “L” dimension shown is relative to the common 1 mm chamfer.
For other sizes, adjust “L” accordingly.
138 ISCAR